The Ultimate Guide to Fuel Injector Ultrasonic Cleaning: How It Works & When to Do It
Your vehicle runs rough, and you suspect dirty injectors. You’ve tried a bottle of cleaner, but the problem persists. The next step isn’t always replacement—it’s ultrasonic cleaning. This professional-grade process is the most effective method short of buying new injectors to remove stubborn carbon, varnish, and deposits that throttle performance. But how does it work, is it worth the cost, and can it save a failing injector? This guide dives deep into the science and application of ultrasonic cleaning for fuel injectors. We’ll explain the technology, outline the professional procedure, and give you a clear framework to decide when this service is the smart choice versus when replacement is unavoidable.
The Science Behind the Bubbles: How Ultrasonic Cleaning Works
Unlike chemical soaks or pressurized flushes, ultrasonic cleaning is a physical process that attacks contamination on a microscopic level.
- The Tank & Solution: The injector is submerged in a heated, specially formulated cleaning solvent inside a metal tank.
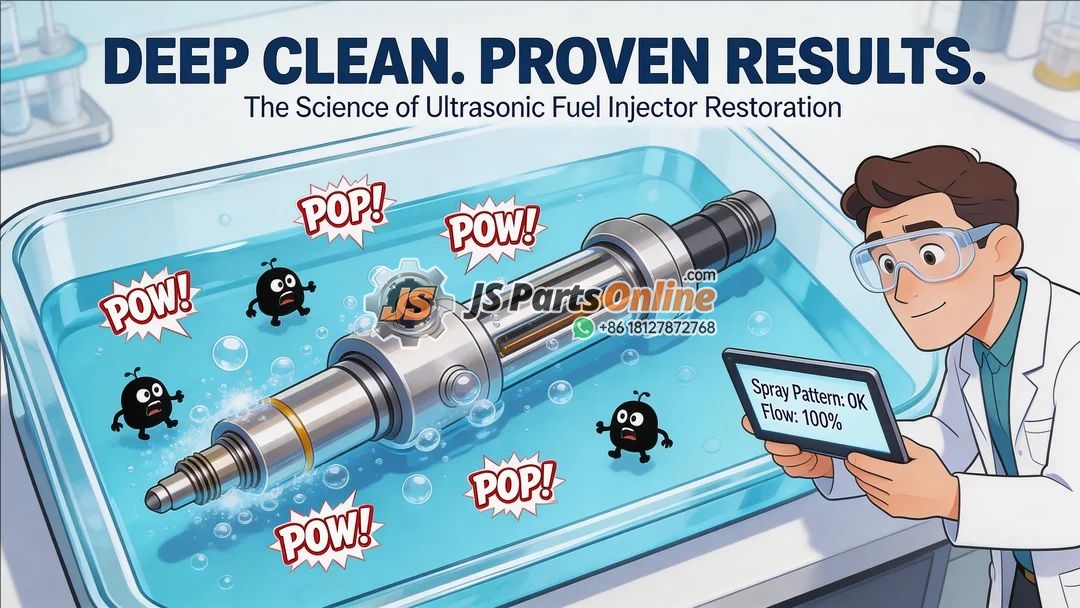
- Transducers & Sound Waves: High-frequency sound waves (typically 25-40 kHz) are generated by transducers bonded to the tank. These waves create millions of microscopic bubbles in the solvent—a process called cavitation.
- Micro-Scrubbing Action: These bubbles form and implode (collapse) with incredible force near all surfaces of the injector, including the internal fuel passages and the microscopic nozzle holes. This implosion energy blasts away carbon, varnish, and debris from every nook and cranny that brushes and chemicals cannot reach.
- The Result: A completely clean injector, inside and out, with restored flow characteristics and spray pattern, provided the internal components are not physically worn out.
The Full Professional Ultrasonic Cleaning Process (Step-by-Step)
A proper cleaning is a service, not just a bath. Here’s what a reputable shop should do:
Step 1: Disassembly & Initial Inspection
- The injector is removed from the vehicle.
- All external seals, O-rings, and filters are removed and discarded. These are single-use items and must be replaced with new ones after cleaning.
Step 2: The Ultrasonic Bath
- The injector body (without seals) is placed in a basket and submerged in the cleaning solution.
- The ultrasonic cleaner runs for a controlled cycle, often 15-30 minutes. Multiple cycles with different solvents may be used for heavy contamination.
Step 3: Rinsing & Drying
- The injector is removed and rinsed with clean solvent or distilled water to remove any residual cleaning solution and loosened debris.
- It is then dried thoroughly with clean, compressed air to prevent any internal corrosion.
Step 4: Reassembly with New Components
- The injector is fitted with brand new, high-quality O-rings, seals, and filter baskets. This step is critical, as outlined in our dedicated guide on fuel injector seals.
Step 5: Post-Cleaning Testing & Validation (The Most Critical Step)
- The cleaned and reassembled injector is mounted on a calibrated flow bench and pop tester.
- Technicians verify:
- Spray Pattern: It must be a uniform, conical mist with no streaming or dripping.
- Flow Rate: It must deliver fuel within the manufacturer’s original specification (typically within 1-3% tolerance).
- Leak-Down: It must hold pressure and not leak internally when closed.
- A test report is generated, providing proof of performance. Without this step, you are paying for an unverified service.
When is Ultrasonic Cleaning the RIGHT Choice?
This service is an investment. It’s ideal in these scenarios:
- Performance Degradation Due to Clogging: When symptoms like rough idle, loss of power, or poor fuel economy are caused by deposits, not mechanical failure. This is often the case for direct injection (GDI) and diesel injectors prone to carbon fouling.
- Preventive Maintenance on High-Value Injectors: Before reinstalling injectors during a major engine service (e.g., intake manifold cleaning, head gasket replacement), cleaning them ensures they won’t be the weak link. This is especially smart for expensive OEM Bosch or Denso injectors.
- Restoring Used or Remanufactured Cores: Quality rebuilders use ultrasonic cleaning as a mandatory first step in their process.
- Before Deciding on Replacement: As a diagnostic step. If cleaning and testing does not restore performance, it conclusively proves the injector has an internal wear or electrical fault and must be replaced, guiding you to our guide on choosing a replacement.
When is Ultrasonic Cleaning a WASTE of Money?
Knowing when notto clean saves you time and cash. Do not clean if the injector has:
- Electrical Failure: A multimeter test shows an open or shorted solenoid coil. Cleaning cannot fix this.
- Mechanical Damage: A cracked body, severely corroded or melted nozzle tip, or a stuck/broken internal needle valve.
- Excessive Internal Wear: If the injector passes cleaning but still fails the post-cleaning flow and leak-down tests, the internal精密 mating surfaces are worn beyond recovery. It needs replacement.
DIY vs. Professional Service: Understanding the Gap
- Consumer-Grade Ultrasonic Cleaners: Small, low-power units sold online are excellent for jewelry or small parts. They typically lack the power, tank size, proper solvent, and—most importantly—the flow bench testing capability required to validate a fuel injector repair. Using one is a gamble.
- Professional Service: Invest in a service from a specialist with automotive experience, the correct solvents, and—this cannot be overstated—a calibrated test bench. The test report is your guarantee of quality. The cost of a professional service for a set of injectors is often far less than the cost of one new injector.
The Cost-Benefit Analysis: Cleaning vs. Replacement
- Cleaning Cost: Typically ranges from 20−50 per injector for the service, plus the cost of a new seal kit.
- Replacement Cost: A new quality injector can range from 50toover500 each.
- The Verdict: For a set of four injectors worth 800new,a200 professional cleaning and testing service that restores them to like-new performance is outstanding value. For a single, common injector that costs $80 new, cleaning may not be cost-effective unless it’s a high-end unit.
Conclusion: A Powerful Tool in Your Maintenance Arsenal
Ultrasonic cleaning is not a miracle cure for all injector problems, but it is the most powerful restorative procedure available. It bridges the gap between DIY additives and full replacement. By targeting the root cause of performance loss—internal deposits—it can extend the life of expensive injectors by tens of thousands of miles. The key is to use it intelligently: on injectors suffering from contamination, and always in conjunction with professional pre- and post-cleaning testing.
Need Injectors Worth Saving? Start with Quality.
The best candidates for ultrasonic cleaning are high-quality OEM or OEM-specification injectors. They are built with the Precision tolerances that cleaning can effectively restore. JSPartsonline supplies the injectors designed to last, whether you’re installing them new or maintaining your existing set.
Considering a cleaning service? Ensure your injectors are worth the investment. Browse our range of serviceable, high-quality fuel injectors, or contact usfor advice on whether cleaning or replacement is right for your specific situation.


JSPartsonline:
Focus on injectors for 12 years,We sell high-quality fuel injectors at competitive prices.
Copyright 2025 © YUN·X . All right reserved.
