
Common Rail Injector Test Bench — Complete Guide to Diesel Injector Calibration and Testing
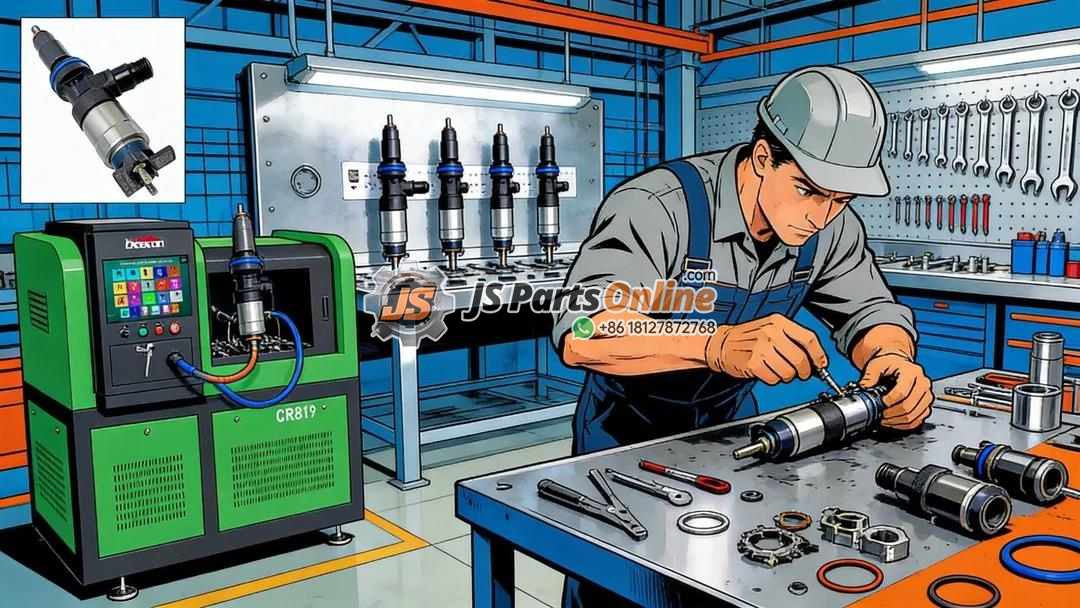
In a professional diesel repair shop, the most critical piece of diagnostic equipment isn’t a scan tool or a multimeter — it’s the common rail injector test bench. While on-engine tests like leak-off measurement and cylinder contribution analysis can point you toward a failing injector, only a dedicated injector test bench can tell you exactly what’s wrong and whether an injector can be repaired or must be replaced. The image above shows a CR819 common rail injector test bench — a professional-grade machine used by diesel injection specialists worldwide to test, calibrate, and diagnose injectors from every major manufacturer. This guide covers everything you need to know about using a common rail injector test bench, from basic operation to advanced calibration techniques.
What Is a Common Rail Injector Test Bench?
A common rail injector test bench is a specialized hydraulic and electronic machine that simulates the operating conditions of a diesel engine’s fuel injection system. It generates high-pressure fuel (up to 2,500 bar / 36,000 PSI), delivers precisely timed electrical pulses to the injector solenoid, and measures the injector’s performance with laboratory-grade accuracy. The CR819 model shown in the image is a popular mid-range bench that supports both solenoid and piezo injectors from Bosch, Denso, Delphi, Siemens, CAT, Cummins, and other major manufacturers.
Key Components of a Test Bench
- High-pressure pump — Generates fuel pressure up to the maximum rating of the injector being tested
- Rail / accumulator — Stores pressurized fuel and dampens pressure pulsations for stable testing
- Injector driver module — Delivers precisely shaped electrical pulses matching the injector’s specification (peak-hold current for solenoids, or fast-switching voltage for piezo stacks)
- Flow measurement system — Measures injection volume per stroke with microgram-level precision
- Control computer — Runs the test bench software, stores injector specifications, and generates test reports
- Test fluid system — Circulates specialized test oil (ISO 4113 or equivalent) with temperature control and filtration
- Safety enclosure — Protects the operator from high-pressure fuel injection (which can pierce skin) and moving parts
Types of Injector Test Benches
| Bench Model | Max Pressure | Injectors Supported | Best For |
|---|---|---|---|
| CR819 (shown in image) | 2,000 bar / 29,000 PSI | Bosch, Denso, Delphi, Siemens, CAT common rail | Mid-range shops, general common rail injector service |
| CR819 Plus | 2,200 bar / 31,900 PSI | All CR819 injectors + piezo injectors | Shops servicing modern high-pressure systems |
| EPS 200 / EPS 708 | 2,500 bar / 36,000 PSI | Bosch, Denso, Delphi, Siemens, CAT, Cummins XPI | High-volume professional injection shops |
| Hartridge AVM | 2,200 bar / 31,900 PSI | Bosch, Denso, Delphi, Siemens, Caterpillar | Dealer-level service centers |
| TestMaster PRO | 2,000 bar / 29,000 PSI | Bosch, Denso, Delphi common rail | Entry-level professional bench, smaller workshops |
What Can a Test Bench Tell You?
A properly operated injector test bench can measure and evaluate the following parameters with precision far beyond any on-engine test:
1. Injection Quantity (Flow Rate)
The test bench measures the exact volume of fuel delivered per injection stroke at multiple operating points — idle, partial load, full load, and maximum RPM. Manufacturer specifications typically allow ±2% variation between injectors. Any injector outside this tolerance range requires adjustment or replacement.
2. Injection Timing
The bench measures when the injector actually opens relative to the electrical trigger signal. Delayed opening can indicate solenoid wear, hydraulic sticking, or internal pressure loss. The timing must be within ±0.1° of crankshaft rotation for proper engine operation.
3. Spray Pattern Quality
Using high-speed cameras or visual inspection through a viewing window, the operator evaluates the fuel spray’s shape, angle, cone symmetry, and atomization quality. A healthy injector produces a uniform, finely atomized cone of fuel. A damaged nozzle produces streaks, drips, off-angle spray, or uneven distribution.
4. Back Leakage (Return Flow)
Similar to the on-engine leak-off test but performed at controlled pressure and temperature on the bench, this measures the internal leakage past the injector’s plunger and nozzle needle. Excessive back leakage indicates worn internal components that will cause poor low-speed performance and hard starting.
5. Minimum Opening Pressure (Pop Pressure)
For mechanically set injectors and some common rail nozzles, the test bench can measure and adjust the pressure at which the nozzle needle lifts off its seat. Incorrect pop pressure causes poor atomization (too low) or incomplete injection (too high).
6. Solenoid / Piezo Electrical Integrity
The bench tests the injector’s electrical actuator — measuring coil resistance, inductance, insulation resistance, and for piezo injectors, capacitance and charge/discharge characteristics. Electrical faults that are intermittent at engine operating temperatures are reliably detected on the bench.
Standard Test Bench Test Sequence
Every injector that arrives at a professional shop goes through this standardized test sequence:
Step 1: Pre-Test Inspection
- Visual inspection for cracks, corrosion, or mechanical damage
- Check electrical connector integrity and pin condition
- Inspect nozzle tip for carbon buildup, erosion, or physical damage
- Record injector identification markings (Bosch IMA code, part number, serial number)
Step 2: Mounting and Setup
- Install the injector in the appropriate test adapter or fixture
- Connect high-pressure fuel inlet and return lines
- Connect electrical harness to the injector driver module
- Select the correct injector specification from the test bench software database
- Enter the injector’s IMA code (for Bosch injectors) or calibration data
Step 3: Warm-Up Cycle
- Run the injector at low pressure and low frequency for 30–60 seconds
- This allows the injector to reach thermal equilibrium and clears any trapped air from the system
- Monitor for external fuel leaks during warm-up
Step 4: Full Parameter Testing
The test bench runs the injector through a programmed test sequence that simulates real engine operating conditions:
- Idle condition: Low RPM, small injection quantity per stroke
- Partial load: Medium RPM, medium quantity — usually 2–3 test points
- Full load: High RPM, maximum quantity
- Overload / maximum: Rated maximum RPM and quantity
- Each test point measures injection quantity, timing, back leakage, and spray quality
Step 5: Results Analysis
- The test bench software compares measured values against manufacturer specifications
- Results are displayed as pass/fail with actual vs. spec values
- Flow deviation between injectors in a set is calculated — all six injectors in a set should be within ±2% of each other
- A test report is generated for documentation and quality assurance
Interpreting Test Bench Results
| Measurement | Normal Range | Problem Indication | Likely Cause |
|---|---|---|---|
| Injection quantity at idle | Spec ± 2% | Low quantity (−10%+) | Clogged nozzle, sticking needle, weak solenoid |
| Injection quantity at full load | Spec ± 2% | Low quantity (−8%+) | Nozzle erosion, plunger wear, low lift |
| Back leakage (return flow) | < 30 ml/min at idle | > 50 ml/min | Plunger/barrel wear, needle guide wear |
| Injection timing delay | < 0.3 ms from trigger | > 0.5 ms delay | Solenoid wear, hydraulic delay, control valve sticking |
| Spray pattern | Uniform cone, no streaks | Dribble, off-angle, streaking | Nozzle tip damage, coking, erosion |
| Electrical resistance (solenoid) | Spec ± 10% | Open circuit or short circuit | Winding failure, wire break, connector corrosion |
When to Test and When to Rebuild
Testing on the bench helps determine whether an injector can be repaired or must be replaced entirely. Here’s the decision framework used by professional injection shops:
| Condition Found | Can Be Repaired? | Recommended Action |
|---|---|---|
| Flow rate out of spec (±2–8%), spray pattern acceptable | ✅ Yes | Rebuild with new nozzle + shim adjustment, then re-test |
| Back leakage high, flow rate within spec | ✅ Yes | Replace control plunger / valve assembly, re-test |
| Spray pattern poor, nozzle damage visible | ✅ Yes | Replace nozzle tip assembly, re-calibrate flow |
| Electrical actuator failed (open/short) | ⚠️ Sometimes | Replace solenoid/piezo stack if available; otherwise replace injector |
| Injector body cracked or corroded | ❌ No | Replace injector — body damage is non-repairable |
| Flow deviation > 10%, multiple failures | ❌ No | Replace injector — extensive internal wear not economical to repair |
Calibration and Adjustment on the Test Bench
One of the most valuable functions of a common rail injector test bench is the ability to calibrate and adjust injectors to match specifications. This is done through several methods depending on the injector design:
Shim Adjustment
Many injectors use precisely ground shims to set the needle lift, spring preload, or control valve clearance. The test bench measures the injection quantity and timing, then the operator selects the correct shim thickness to bring the injector within spec. A change of 0.01mm in shim thickness can alter injection quantity by 1–2 mm³/stroke.
IMA Code Programming (Bosch)
Bosch common rail injectors are manufactured with individual IMA (Injector Manufacturing Adjustment) codes — a set of six calibration values that compensate for manufacturing tolerances. These codes must be programmed into the engine’s ECU when injectors are installed. The test bench can verify the factory IMA code and, if the injector has been rebuilt, generate a new corrected IMA code for programming.
Solenoid Lift Adjustment
Some injectors (e.g., Bosch CRIN injectors with solenoid actuators) allow adjustment of the solenoid armature lift. Lifting too far delays response; lifting too little restricts flow. The test bench determines the optimal lift setting, and the operator adjusts using precision shims.
Nozzle Replacement and Seat Lapping
When a nozzle is replaced, the new nozzle must be matched to the injector body. The test bench confirms correct seat sealing (no pre-injection leakage) and proper spray pattern before the injector is returned to service.
Safety Precautions When Operating a Test Bench
⚠️ Critical Safety Rules
- Never place your hand near the injector nozzle during testing — injection pressure can pierce skin and inject diesel fuel into your bloodstream, causing sepsis or amputation
- Always use the safety shield or enclosure provided with the test bench
- Use only approved test fluid (ISO 4113 calibration oil) — diesel fuel has inconsistent viscosity and lubricity that produces unreliable results
- Wear safety glasses and fuel-resistant gloves
- Ensure all high-pressure connections are properly tightened before pressurizing the system
- Follow the test bench manufacturer’s lockout/tagout procedures when performing maintenance
Maintaining Your Test Bench
A common rail injector test bench is a precision instrument that requires regular maintenance to produce accurate results:
- Daily: Check test fluid level and condition; drain water from the filter/separator; inspect high-pressure hoses for wear
- Weekly: Clean test fluid filters; run a calibration verification test using a reference injector; check and record system pressure stability
- Monthly: Replace test fluid filters; inspect and tighten all electrical connections; lubricate mechanical linkages
- Quarterly: Replace test fluid (ISO 4113 calibration oil); calibrate pressure sensors using a traceable reference gauge; verify flow measurement accuracy
- Annually: Full factory calibration by the manufacturer or authorized service center; replacement of high-pressure hoses; inspection of pump and motor bearings
Choosing the Right Test Bench for Your Shop
If you’re considering investing in a common rail injector test bench, here are the key factors to evaluate:
- Maximum pressure rating — Ensure it covers the injectors you service most (2,000 bar minimum for modern common rail; 2,500 bar for future-proofing)
- Injector compatibility — Verify that the bench supports the injector types and manufacturers you work with (Bosch, Denso, Delphi, Siemens, CAT, Cummins)
- Software and database — A comprehensive injector specification database saves hours of manual data entry. Look for regular software updates
- Piezo injector support — If you service modern European vehicles, piezo support is essential
- Flow measurement accuracy — ±0.5% or better is required for professional calibration work
- Service and support — Local technical support, training availability, and spare parts availability in your region
- Price and ROI — A professional bench costs $15,000–$50,000+. Calculate your break-even point based on expected injector service volume
Frequently Asked Questions
Can I test an injector on the bench without removing it from the engine?
No. The injector must be removed from the engine and mounted in the test bench’s adapter fixture for proper testing. On-engine tests (leak-off, cylinder contribution, pulse width analysis) serve as screening tools to identify which injectors need bench testing.
How long does a full injector test take?
A standard test sequence (warm-up + full parameter test) takes approximately 5–10 minutes per injector. A complete set of six injectors can be tested in 45–60 minutes, including setup and reporting.
Do I need a different test bench for HEUI injectors?
Yes, HEUI injectors require a different test machine because they are actuated by high-pressure engine oil rather than fuel pressure. Some test benches offer dual-mode capability (common rail + HEUI), but most are specialized for one system.
Can a test bench fix an injector?
No — the test bench only diagnoses and calibrates. Actual repair (disassembly, cleaning, part replacement, and reassembly) is done separately by a diesel injection technician. The test bench then verifies that the repair was successful and calibrates the injector to specification.
How often should an injector test bench be calibrated?
Professional calibration of the test bench itself should be performed annually by the manufacturer or an authorized calibration service. In-house verification using a reference injector should be done weekly to ensure consistent results.
Conclusion
A common rail injector test bench is an indispensable tool for any professional diesel injection shop. The CR819 model and similar benches enable technicians to diagnose injector faults with precision that on-engine methods simply cannot match, measure injection quantity within ±1%, evaluate spray quality under real operating conditions, perform calibration adjustments through shim selection and IMA coding, and make data-driven repair-or-replace decisions. Whether you’re currently using a test bench in your shop or considering investing in one, understanding how these machines work and what they can tell you is essential knowledge for anyone serious about diesel fuel injection service. When injectors leave your shop tested and calibrated on a proper bench, your customers get better performance, better fuel economy, and fewer comebacks.
Looking for replacement CAT diesel injectors, Bosch injectors, or Denso injectors? Browse our complete catalog at JSPartsonline.





JSPartsonline:
Focus on injectors for 12 years,We sell high-quality fuel injectors at competitive prices.
Copyright 2025 © YUN·X . All right reserved.
