Fuel Injector Markings & Numbers Decoded: Your Guide to Identification
A fuel injector is more than just a metal and plastic component; it is a catalog of information. Laser-etched, stamped, or printed on its body are various codes and numbers that hold the key to its identity, specifications, and compatibility. To the untrained eye, it’s a jumble of characters. But to a technician, fleet manager, or savvy parts hunter, these markings are the Rosetta Stone for accurate identification, verification, and cross-referencing. This guide will teach you how to read and interpret the most common fuel injector markings. You’ll learn to distinguish an OEM part number from a manufacturer code, understand date and batch information, and use this knowledge to confidently source the correct replacement part, ensuring a perfect match for your engine.
Why Decoding Markings is a Critical First Step
Incorrect part identification is the root cause of costly returns, failed installations, and poor performance. Relying solely on the vehicle’s year, make, and model is risky due to mid-year production changes and multiple engine options. The markings on the injector itself provide the only definitive, physical proof of what you have and what you need. This is the foundational step emphasized in our guide on finding the exact part number.
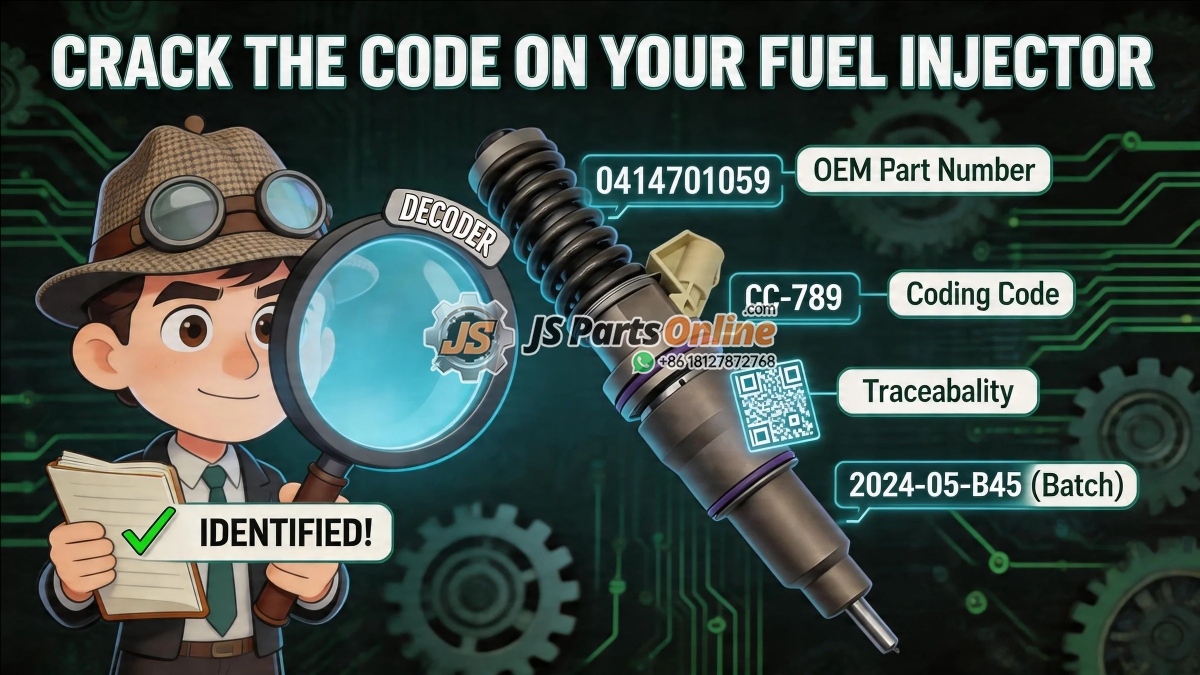
The Major Markings: What to Look For and Where
Inspect the injector body carefully. You will typically find several codes in different locations (top, side, near the connector). Here’s what they usually mean:
1. OEM (Original Equipment Manufacturer) Part Number
- What it is: This is the part number assigned by the vehicle manufacturer (e.g., Ford, BMW, Cummins) for their parts catalog. It is the primary number used by dealerships.
- How it looks: Varies by brand. (e.g.,
0 281 002 870,0280158123,23609-ABC01). - How to use it: This is the most direct number to use when searching for a genuine OEM replacement. Entering this number into a reputable parts catalog should yield an exact match.
2. Component Manufacturer Number (Bosch, Denso, Delphi, etc.)
- What it is: The parts supplier (e.g., Bosch, Denso, Siemens) has its own internal part number for the component. Often, this number is more widely recognized in the aftermarket than the OEM number.
- How it looks: Specific to the manufacturer. A Bosch number might be
0 445 115 103; a Denso number might be095000-6220. - How to use it: This is arguably the most useful number for cross-referencing. High-quality aftermarket and OEM-specification parts are typically cataloged using these core manufacturer numbers. You can search our extensive catalog using these numbers to find compatible, high-quality replacements.
3. Engineering/Application Code or “Hole” Code
- What it is: A shorter, alphanumeric code that identifies the injector’s specific flow calibration and application within a family. This is critical for coding.
- How it looks: Often 4-6 characters (e.g.,
13P2B5,A2C59511600). On some diesel injectors, it’s a simple 3-digit “hole code”. - How to use it: This is the coding or calibration code. When replacing an injector on a modern engine, this code must be programmed into the vehicle’s ECU to ensure optimal performance. Our guide on injector coding and calibration explains this mandatory process.
4. Serial Number / Date and Batch Code
- What it is: A unique identifier for the individual injector, often including manufacturing date and batch information.
- How it looks: A long string of numbers and letters. May encode the year/week of manufacture (e.g., “2345” for week 45 of 2023).
- How to use it: Primarily for manufacturer traceability and warranty claims. Useful for verifying the age of a used or remanufactured part.
5. Barcode / Data Matrix Code
- What it is: A machine-scannable representation of the part’s key data, often containing the OEM number, manufacturer number, and serial number.
- How to use it: Professionals use handheld scanners to instantly pull up part information in their database. As a consumer, it confirms the injector is a genuine, traceable part.
Step-by-Step: How to Decode Your Injector
- Remove and Clean: Safely remove the injector and clean the exterior with a non-abrasive cleaner and a soft brush. Make all markings visible.
- Photograph All Sides: Take clear, well-lit photos of the injector from all angles. Zoom in on any engraved or printed text.
- Identify the Longest Number: The longest string of numbers (often 9-11 digits) is usually the core OEM or manufacturer part number. This is your primary search key.
- Look for the Short Calibration Code: Find the shorter, separate code. This is your coding code.
- Use Online Resources and Catalogs: Enter the core part number into the search bar of a specialized supplier’s website. Use the “OEM Part Number Interchange” or “Cross-Reference” function if available.
Common Marking Locations by Brand (General Guide)
- Bosch: Numbers are typically laser-etched vertically or horizontally on the flat side of the injector body.
- Denso: Often have a label or are stamped on the side. The number may start with “09” or “23”.
- Delphi: Markings are commonly found on the side or top of the injector.
- Siemens/VDO: Usually etched on the metal body.
Red Flags: Signs of Counterfeit or Incorrect Markings
The aftermarket has issues with counterfeit parts. Be wary if:
- Markings are Poorly Etched or Stamped: Blurry, uneven, or shallow engravings.
- Font Inconsistency: The font style looks different from known genuine examples.
- Missing Standard Codes: A modern injector with no visible calibration or manufacturer code is suspicious.
- Price is Too Good to Be True: Coupled with vague markings, this is a major warning sign. The risk of engine damage from a fake part far outweighs the savings, a point central to our analysis of OEM vs. aftermarket quality.
The Final Verification: Beyond the Markings
The numbers tell a story, but final verification is key:
- Physical Comparison: Compare the physical dimensions, connector type, and nozzle configuration of the old and new injector. They must match exactly.
- Electrical Test: Verify the solenoid resistance (in ohms) matches the specification for your vehicle.
- Consult an Expert: If in doubt, send your photos and numbers to a technical support team. Reputable suppliers offer this service to prevent costly mistakes.
Conclusion: Knowledge is the Best Tool in Your Box
The ability to decode the markings on a fuel injector transforms you from a guesser into an informed buyer. It empowers you to verify the part in your hand, cross-reference it accurately, and communicate effectively with parts suppliers and technicians. In a world where a single incorrect digit can lead to a failed repair, this knowledge is your first and most important line of defense, ensuring the component you install is the one your engine was designed to run with.
Identify with Confidence, Replace with Precision.
At JSPartsonline, we understand that it all starts with the right number. Our catalogs are built to accept the core OEM and manufacturer codes you find on your injector, and our technical team is skilled at decoding markings to find the perfect match.
Crack the code on your fuel injector. Use our search with your part numberor send our experts clear photos of your injector markingsfor a guaranteed identification and a perfect-fit solution.
Posts Widget
-
1

-
2

-
3

-
4


JSPartsonline:
Focus on injectors for 12 years,We sell high-quality fuel injectors at competitive prices.
Copyright 2025 © YUN·X . All right reserved.
